Open OnDemand is an NSF-funded, open-source HPC portal that allows for ease of access to HPC resources. This accessibility unleashes the power of supercomputing to advance discovery and innovation. This article targets individuals with programming experience who want to develop Open OnDemand or applications for it.
Perhaps you've wanted to contribute back to Open OnDemand but you're not quite sure how to get started. You don't want to play around on a production environment, but maybe you don't have a test environment. Maybe the changes you want to make are way out of bounds for any real environment. Maybe you just want to experiment a little on how it's configured and runs.
This blog is going to show you how to do just that. It's going to show how I setup my local Open OnDemand development environment so that you can test anything you like.
It's going to be an Open OnDemand server that's completely under your control and on your local machine so you can develop and experiment all you want.
Containers
First, we're going to talk about containers for just a second. Now, this blog post isn't going to go through all the amazing things about containers, of which there are many; it just can't. For more information on Linux containers, just Google search a bit about ‘Docker’ or ‘Linux containers’ or watch some conference talks (there are some very good conference talks on the topic). If you're not familiar with containers, you probably should familiarize yourself with them, otherwise this may be a bit hard for you.
Other folks on my team use Vagrant and while I think that's all well and good, that's not my workflow, so that'll have to be some other article.
I like to use containers for a few reasons, but mostly they're just fast to boot and, as we'll see, easy to modify. More than that, they're safe to modify. If you break something, or rm -rf * or install the wrong package, just bounce the container and you're back to the original image state. Modifying a container in and of itself isn't the value here; it's the ability to do it safely and to always go back to a known good state.
Hacking the Base Image
You'll need to use the Ohio Supercomputer's Open OnDemand image from DockerHub (ohiosupercomputer/ood:latest). Here I'm going to use the podman command, but docker will work just the same (in fact I’ve just ported the same functionality to a Dockerfile in the repository linked below). I run podman as my container runtime, but where applicable and time permitting I'll try to port the same behavior and functionality to docker because I know folks really like to use it (also pull requests welcome!).
For this to work well we need correct UID mapping inside and outside of the container. Podman has a really nice way of facilitating that and is all about running in a rootless context, which I like. I don't want to be root, and I don't need to be.
The buildah script I use to hack this image is here, but I'll provide some portion of it here as well with some comments.
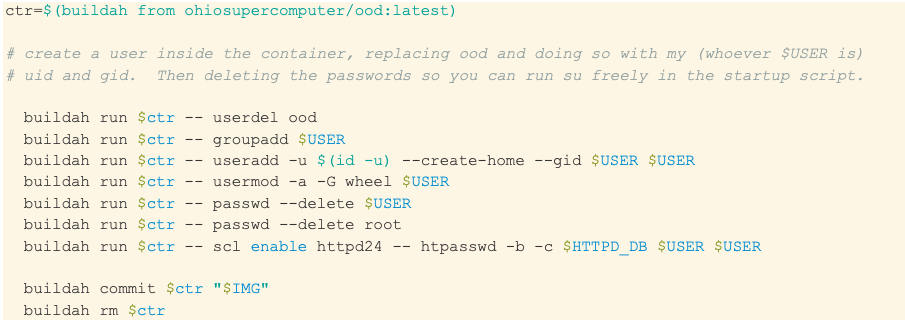
As you can see, I've really just taken the base image, removed the ood user and replaced it with myself.
Why UIDs Are Important
Now that I've setup the user who has the same uid and gid as myself inside the container, I need to map my host uid to the container uid. Podman comes with a nice facility for this which is --userns=keep-id. Docker probably has something similar, like -u and -g flags.
Why you may ask? Why go through all this trouble? To read and write files correctly! As you'll see in the next sections, mounting your host folders correctly to the container is super critical. Indeed, it's really one of the main benefits of this whole endeavor. So being the same uid/gid on both sides make it super easy to interact with your host files inside your container.
In a nutshell it's this: you have something you're working on using your host system. We're going to mount that to the container so that it reads, boots and interacts with it. Being able to read the files is important, but sometimes I want to write files too. And I definitely want them to persist them through container restarts.
Mounts, Mounts and More Mounts
Mounts are where the magic happens. Well not magic really, but it is a big part of why this setup is convenient. I mount all sorts of directories to my Open OnDemand container, so that when it boots, I've given it all sorts of specific configs, different system runtime libraries I'm developing, my own dev
director and much more.

Here you can see all the mounts I use in an env file I source. There are quite a few! I even override launch-httpd which is the entry-point of the container! I mount almost every configuration file so that I can keep these configs through container restarts.
Here's an excerpt from that env file. In this example I'm mounting a local path that is actually our configurations for Open OnDemand at OSC. So If I want to play around with our CSS branding or message of the day (in /etc/ood/config/apps), or I'm experimenting with how clusters are configured (/etc/ood/config/clusters.d), I can do so and test on my local instance without any possible disruption to an actual instance.
But you can also see from that env file I've mounted all sorts of things in the past like the ood_core library that powers job submission. I'm able to mount that folder and work on it directly instead of having to run through a long and tedious build, deploy, test cycles.
That's the real value-add here with mounts and containers. I keep the important stuff I'm working with on my host (and they're likely backed up by git) and I don't care about the actual runtime or the container's OS files. I don't care about the things inside the container, I care about my host files. Let the runtime bounce! Let the container's OS change! My configurations will persist through reboots or upgrades and both can happen super-fast.
Start-Up
Clearly, I can't just run “podman run ood:dev” or “docker run ood:dev”. I want to mount all these things, I want to pass in user namespace flags and, in the future, I may also want to attach it to different networks.
So, I use this helper script which will source the env file from above and run the container. It's a helper, so it also helps me stop/start and restart it too along with all sorts of other toggles and options.
Conclusion
So that's my development workflow. You take the ‘ohiosupercomputer/ood:latest’ image, create a user that has the same uid and gid as you, then you mount things like crazy! That is essentially it, the rest of this blog is just descriptions on why you may want to do that, and why it's beneficial. Which it is beneficial. Again, containers are fast to boot and modify. Much faster than virtual machines. Plus, since they run on the same kernel, they're much lighter weight and you get all the benefits of sharing the host filesystem inside the container.